
Do you already have an indoor Nuri for the winter?
For a long time now, I’ve had a Sport-Wing from Icon Modelldesign as my all-purpose flying wing for every situation and every condition. I use it to explore new slopes, hunt for thermals, and in the Alps—where landing spots are often strewn with rocks—the EPP’s durability is frequently praised. I’ve also thought about a fiberglass version of the Sport-Wing with detachable wings for easier transport. I’ve always been fascinated by something small and cute that I could carry in a suitcase—without a motor and certainly no gasoline—to comply with the latest airline regulations for carrying aircraft.
The epiphany came at the 5th Modellbau Bodensee in Friedrichshafen. Icon Modelldesign presented a throw-style monoplane designed to be launched with a rubber catapult. It looks like a tiny Sport Wing—also made of EPP—just two sizes smaller; it’s called the Junior Wing, and I bought it at the show for EUR 9.80.
The Junior Wing comes in a plastic bag, complete with the wing, a 15-gram steel weight, a holding/landing skid with an integrated launch hook, two aluminum plates for initiating a circular flight, decal sheets, and illustrated assembly instructions.
The center section of the wing must have enough space for a receiver and a receiver battery; two servos must be installed, the appropriate linkages must be provided, and the control surfaces must be cut out.
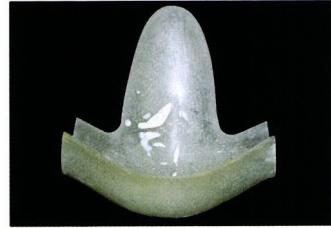
The RC installation, located centrally in the middle of the wing, must be covered. To do this, I fabricated a fiberglass-reinforced plastic (FRP) cover designed to protect the wingtip from walls, the ground, or anything else that might be in the way. To do this, I first laid several strips of adhesive tape—waxed and treated with release spray—across the wing. On top of that, I laminated one layer of 163 g/m² and three layers of 390 g/m² twill fabric from R&G. The nose section was reinforced again with the same fabric, and finally, to save on sanding, finished with a thin 25 g/m² fabric. After it dried, I simply slid the mold
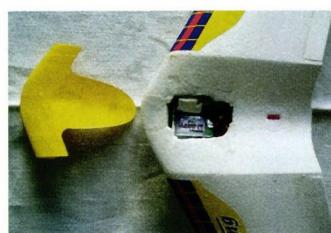
I carefully sanded down the EPP and filled in any uneven areas. Using the mold I had created, I then made a cover. To use the included decorative sheets, I dyed the resin yellow. I then laminated two layers of 105 g/m² silane-treated fabric, which absorbs very little resin and thus saves weight. The nose area was reinforced with two additional layers of the same fabric. Since the outer mold is smoothly sanded and thickly molded, I can snap off the excess fabric at the edge of the finished, cured part, and the part comes out of the mold ready to use. It fits perfectly onto the EPP wing without adding bulk and reinforces the nose edge.
The elevons (QR and HR combined) stand out. The Nuri model features a clamped aluminum part as an aileron to give the wing—which is catapulted at that height—a circular flight path. The recess molded into the EPP to accommodate the aluminum part was extended and cut out at a 30-degree bevel to allow room for the control surface’s travel.
The control horns were cut from 0.8 mm GRP laminate scraps and embedded using 5-minute epoxy.
Two Futaba S3108 nano servos are to be installed on the lower wing section in the protected “seagull bend.” A 0.8-mm wire was bent around the servos, joined together, and screwed into a soldering iron as a “soldering tip” and heated to achieve a clean, precise cut for the servos. If the soldering iron’s heat output isn’t sufficient, use a gas torch to help, wait a moment, and then cut cleanly. The cutting wire must not be too hot, otherwise the EPP will melt. So, try it first on a scrap piece of regular Styrofoam.
I bent the control wires from 0.8-mm steel wire. Both ends have a Z-shaped end to keep things simple and lightweight. A U-shaped loop allows for easy squeezing or
| Model Name: | Junior Wing |
| Intended use: | Indoor and outdoor mini flying wing |
| Manufacturer/Distributor: | Icon Modelldesign |
| Price without conversion parts: | EUR 9.80 |
| Model type: | EPP wing |
| What's Included: | EPP wing, catapult, decal sheet |
Parts needed for the conversion:
- 2 nano servos
- 2 control horns made of 0.8-mm fiberglass-reinforced plastic or 1-mm plywood
- Approx. 40 cm of 0.8-mm steel wire
- 2 CFRP tubes, 3/2 mm in diameter × 60 mm long
- 1 RC cover (see text for source)
- 1 receiver
- 1 battery pack
- 30 cm of Scotch tape from an office supply store
Building Instructions:
The construction of the Wurfnuri is explained in a two-page brochure with pictures. The conversion requires some technical knowledge, especially regarding the installation of RC systems.
| Wingspan | 465 mm |
| Flight weight of test model | 69 g |
| Elevon | 2× Futaba S3108 Nano or Jamara Mini-Blue |
| Mixers used | Elevon with Expo 40% |
| Radio Control System | Futaba |
| Receiver | PENTA 5 35 MHz |
| Receiver battery | 1S LiPo 145 mAh Multiplex |
Suitability:
If it weren’t for the conversion, it would be absolutely beginner-friendly; for the conversion, assistance from an experienced model builder is recommended.
| Where to Buy | Specialty stores |
Expanding the U allows the zero position to be adjusted mechanically as well, not just electronically.
To achieve flight stability similar to that of its bigger brother, I attached winglets made of 3-mm Depron to the wing tips. To ensure a clean cut edge, I built a mold out of plywood. The edges are finely sanded. Using the Proton hand router, I run the tool along the edge and mill out the two parts, then glue them in place with medium-strength superglue. This not only looks good but also improves the model’s control response.
For the receiver, I used a PENTA 5 Mini receiver from my Depron plane. This receiver can be powered by a 1S LiPo battery. I connected a 1S, 145 mA battery from Multiplex. The space cut out of the wing was attached to the
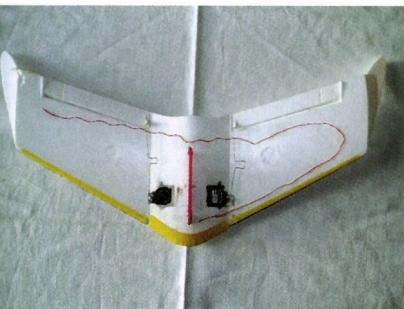
The ends are bridged with a 3-mm CFRP tube to absorb the bending forces caused by the wing load. Since the depth is limited and the remaining thickness of the EPP on the lower part of the wing wasn’t exactly generous, I reinforced the cutout with 25 g/m² fiberglass canvas.
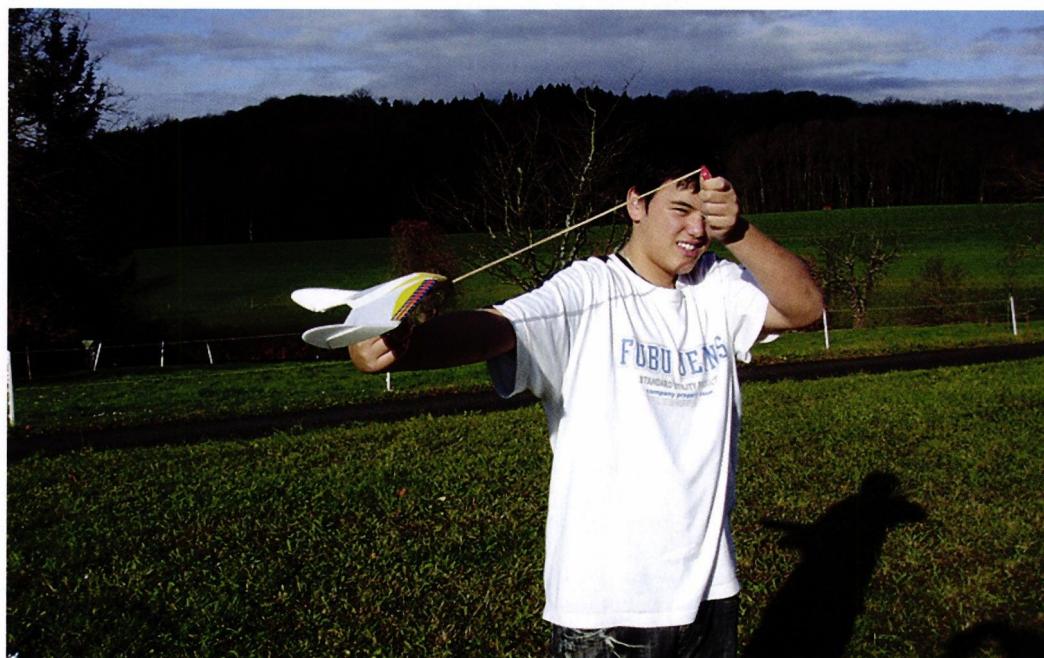
Just like with its big brother, I set the aileron deflections to 40% Expo. To keep his hands on the control stick—and knowing that the launch speed from the rubber catapult would provide plenty of lift—my son launched the Junior Wing. The first flight was a half-throttle, level flight to see how the Nuri handled in the air.
The manufacturer’s specification for the defined center of gravity—40 mm in front of the trailing edge of the launch hook—is accurate. However, with the lightweight RC installation, it couldn’t be maintained without additional weight. I used six small lead pellets. The takeoff weight is 69 g.
After a gentle first landing comes the ultimate “rocket launch”—that is, taking off vertically, gaining altitude, trapping the updraft, and steering into a horizontal flight attitude. The catapult rubber is a bit light for the RC Junior Wing, but it’s sufficient for indoor use.
If you want to skip building the mold, you can purchase an RC cover in white, yellow, blue, black, or red from the author for 10 Swiss francs plus shipping.
<http://www.unirich.biz/Modellflug/modellflug.html>
Please send an email or fax and specify the color.
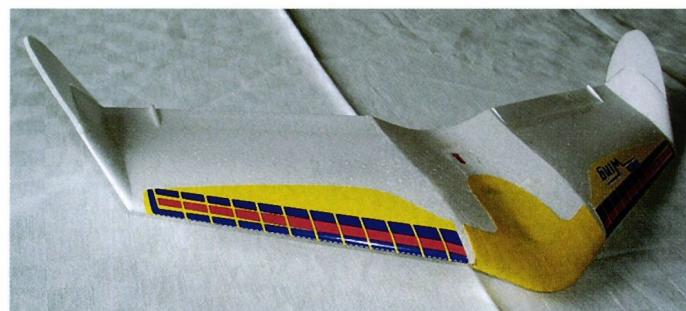
The ready-to-fly Junior Wing.


News from HEBU

YOU KNOW WHAT I MEAN? 125 YEARS OF THE SWISS AERO CLUB
 Emil Giezendanner

F3A EUROPEAN CHAMPIONSHIPS IN ST-MACAIRE, FRANCE
 Matthias Bosshard

What's New at Leomotion.com

52. 2026 ALPS CUP
Emil Giezendanner
PRIDE AND GOOD IDEAS
 Markus Nussbaumer

EURO CONTEST GLIDER ACRO TOUR AUSTRIA 2026

TEAM MANAGER "THIS" BOSSHARD
 Rodito Nussbaumer

HORIZON HOBBY/LEMACO NEWS: MICRO OV-10 BRONCO 645 MM BY E-FLITE

BY YOUTH, FOR YOUTH
Lorena Betschen
CORSAIR F4U – A WARBIRD WITH A MEMORABLE LOOK
Jürgen Rosenberger, Jürgen Prinz
SMALL, MODEL-LIKE SAILBOATS
Res Dauwalder
TRY-OUT DAY AT MFV WETTINGEN
Urs Keller
34th HAHNENMOOS ALPINE MODEL AIRPLANE CAMP
Res Dauwalder
SUMMER FUN 2026 AT MG USTER
Martin Wunderli
WELCOME, NEW MEMBER!
Andrea Bolliger
FREE FLIGHT IN THE MIDDLE OF SUMMER
Urs Muntwyler
THE PC-21 STORY
Emil Giezendanner
TWIN TOWN PARTNERSHIP
Wolfgang Voeller
ATOM, THE NEW DOUBLE-DECKER FROM CPLR
Matthias Bosshard
COUPE DES ALPES – OBSERVE AND LEARN
Rodito Nussbaumer
INSIGHTS INTO THE HISTORY OF SEAPLANES

NEWS FROM HEBU
 Julia Bucher

FROM 0 TO 100
Markus Nussbaumer
MEMORIES
Wolfgang Völler
NOS REGION – A HUB FOR ELECTRIC AVIATION
Emil Giezendanner
A SPECTACULAR F3A WORLD CUP IN THE PRINCIPALITY OF LIECHTENSTEIN
Emil Giezendanner
Have you almost forgotten about aircraft that take off and land vertically?
Emil Giezendanner